3.7.2.1. At startup Lisa shows a hard drive error 81, what can I do?
This information is applicable to a Lisa 2/10 or Macintosh XL containing a 10MB internal Widget hard drive.
- error 81 is not exclusively caused by misadjustment/failure of the Widget brake, other problems can generate this error too, such as a bad cable/connection.
When the Lisa is turned on, the Widget drive will spin up and perform its own self-test. This happens independently of, and concurrently with, the Lisa's self-test. The Widget self-test and brake-release described below does not recur if the reset button is pressed; it occurs once at power-on only.
After the Widget spins up, the electric head brake releases with a distinct clunk or clack followed by the characteristic squeaking noise of the Widget head motor.
If the brake does not release, the Widget's self test won't complete successfully and the drive does not respond to the Lisa; the result is a cross over the internal drive icon with error code 81.
Without further information, many people assume that they need a whole new hard drive. Rather than spend the money, they shelve the computer. Well, it's time to dust it off! Error code 81 may simply mean the brake is out of adjustment. You can fix it, easily, in under an hour, with a #1 Phillips- head screwdriver and a .012 inch (0.3 mm) feeler gauge. Here's the complete procedure:
1. Disconnect the computer's power cord from the wall outlet. 2. Remove the disk-drive cage as shown in Figures 1 to 3. 3. Disconnect all data and power cables from the installed drives. 4. Turn the cage upside down. This puts the relatively light disk drive on top and the relatively heavy hard drive on the bottom.
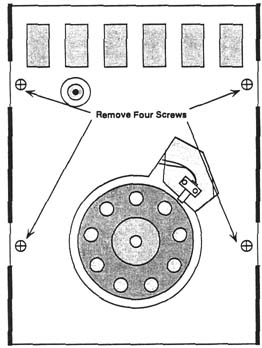
Figure 25 Four screws hold the Widget assembly to the sheet metal support bracket.
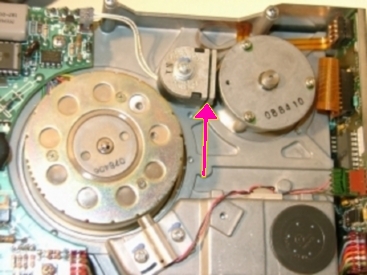
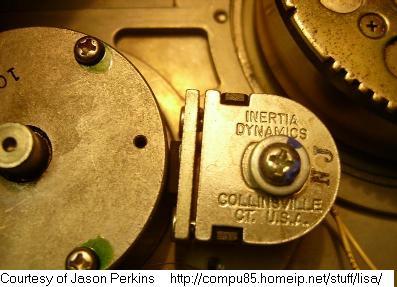
5. Use a #1 Phillips-head screwdriver to remove six screws (three on each side of the cage) which hold the hard drive in place. 6. Lift the drive cage straight up. This leaves the hard drive upside down on the table. 7. Use a #2 Phillips-head screwdriver to remove four screws from the sheet metal support bracket as shown in Figure 25. Lift the bracket away and put it aside. 8. Locate the solenoid marked "Inertia Dynamics, Collinsville, CT USA." Insert a 0.012-inch feeler gauge as shown in Figure 26.
Tighten the screw, reverse steps 7 through 1, and everything should be OK. If not, repeat steps 1 through 9, allowing a little more or a little less clearance, until you get the brake working.
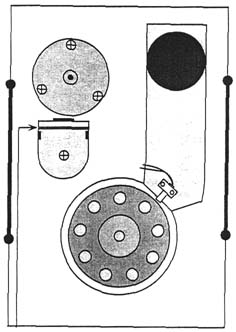
Figure 26 Adjust the brake gap (indicated by the arrow) with a 0.012-inch feeler gauge.
Actual photos of the drive mechanism (courtesy of JDM)
Closeup.
9. At the time of failure, clearance might be as much as 0.075 inch. Loosen the solenoid holding screw and adjust for 0.012-inch clearance.
Source: http://www.cs.dartmouth.edu/~woz/lisatech/page28_29.html ( Lisa/Macintosh XL Do-it-yourself Guide published by Sun Remarketing, Inc. )
Addendum JDM 2006-06-24
- In some cases, the Widget's brake does not release because the drive does not spin up. You may be able to get the drive to spin up by flipping the front side of the flywheel from right to left with the eraser end of a pencil. You have a few seconds after power-on or the Widget's self test will conclude it is not going to spin up to the correct speed and stop trying.
- If you are successful at starting your drive this way, backup your data immediately as it may not start again
Typical Widget self-test timing (seconds)
| 0 | Power-on | Waiting for platter spin-up |
| 10 | Spin-up complete | Waiting for brake release |
| 20 | Brake Release | Start fast surface scan |
| 28 | Fast scan complete | Start slow surface scan |
| 88 | Surface scan complete | Drive Ready |
� [LisaFAQ] > [Hardware] > [Hard Drives] (Comment on this answer)