3.9.1. How do I repair my Lisa's keyboard?
Opening the keyboard case.
Flip the keyboard over, being careful not to push down on the keys. You might want to have another person help you, or use two sturdy cardboard boxes so that when you apply pressure on the screws, you don't harm the keys.
You'll see that there are five screws you'll need to unscrew. Two on the left, two on the right, and one on the bottom, under where the space bar is. Remove them, then carefully flip the keyboard right side up. The screws will fall out, don't lose them.
Gently remove the top cover. This will reveal the keyboard. You can lift this up and turn it over. This reveals a ground connection screw and a plug.
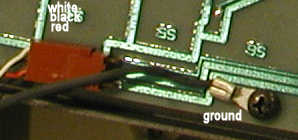
Gently remove the plug, then unscrew the ground wire, being careful not to lose the screw. You can now separate the keyboard from the bottom half of the case.
If you intended to wash your case, note that you cannot wash the bottom half of the case as
it is attached to the cable with no way to release it without damaging the cable.  Instead,
gently wipe the case with a paper towel.  Also, if you were to place the bottom half of the
keyboard into a dishwasher, you can expect to damage the serial number, and other stickers.
Gently blow away any dust between the keys. You can use your breath, or a small vacuum cleaner (be careful not to use one that's large enough to suck out the keys) stay away from compressed air as it can leak fluid into the keyboard, ruining it.
Check the coiled cable for breaks
Next, get an Ohm meter, set it on continuity and test the cable. All three wires should work, if they don't, you'll need to make your own cable, or find out where the break is. Sometimes, it'll be enough to wipe the grime off the phone plug.
The black ground wire that you unscrewed should map to the largest portion of the phone plug (the one farthest away from the tip.) The middle black wire on the inside brown connector jack should also map to ground.
The white wire should map to the middle of the phone plug.
The red wire should map to the tip of the phone plug.
The back of the PCB
Check the back of the printed circuit board. All the traces should be clean, no warping or scratches, and the solder points clear and shiny. If they're not, you might want to gently reflow the solder points. If you see warped, cracked, or cut traces, solder a wire across the solder points for that trace and glue the wire down to the PCB using a few drops of well placed hot melt glue. (Hot melt glue is reccomended because if you make a mistake, it can easily be removed without causing too much damage.)
If your keyboard works perfectly, stop here and reassemble it. If not, continue on with care.
Disassembling the key switches from the PCB
On the black metal tray, there are five screws. Two on the left hand side of the keyboard, one next to the left shift key, the other next to the ~ key. Another is above the 5 key. On the right hand side, to the right of the Numeric keypad, there's one screw next to the Enter key and another next to the * key. Unscrew these, but be careful not to put too much downward pressure as you can break off the keyboard connector plug if you do. It's best to do one side at a time with a cardboard box underneath the "ears" of the black metal tray so that you keep the plug safe.
Next, flip the keyboard over. There are numerous small screws throughout. Unscrew these taking care to not put pressure on the keyboard. These small screws are connected to the actual keyswitches - they're fairly easy to remove, but require extra care when you screw them back in.
Now gently remove the PCB from the metal keyboard tray.
The pads on the PCB should be clean. Don't touch the pads, but rather gently blow any dust away.
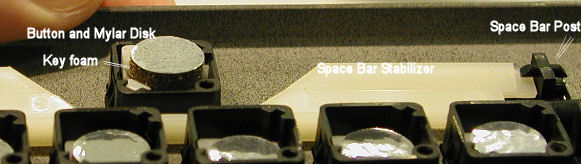
On the keyboard side, you'll see electrically non-conductive silver disks. Be careful not to damage these. Underneath them, there is a foam pad, and underneath them another disk.
Repairing the key switches
The Lisa keyboard's switches are not ordinary switches; they work by altering the capacitance between pads on the PCB using a non-conductive metallic looking foil disk (mylar?) on each key plunger. When a key is pressed, the foil presses against the pad (under the pressure of some foam material) which forms a capacitor; this is translated into an electrical impulse.
The soft foam deteriorates over the years and deforms. This is the usual cause of stuck, unresponsive, and poorly-working keys.
The Lisa uses a 3mm-4 mm thick foam material. This foam material is glued to a small round plastic disc on the key side which "snaps" inside the keyswitch plunger mechanism. On the circuit board side there is a special metallic appearing, but not electrically conductive foil.
Open the keyboard very carefully and reconstruct the key switches using new foam material. Don't forget to clean the pads on the PCB to remove the sticky glue and foam smudge. It is estimated that this will take a full afternoon, but once completed, you'll have a fully operational keyboard.
The circular disks that clip into the plungers can be popped out which makes it easier to remove the remnants of the old foam and attach new foam without contaminating the plunger mechanism.
Where you can, ecycle the existing foil pieces and reuse them. If you cannot, if the foil is worn out or destroyed, you can make new ones, but follow these instructions carefully:
Making your own foil disks
Take a sheet of aluminum foil, keeping it smooth and flat. Apply a single layer of Scotch tape on both sides of it. Cut out perfectly circular pieces, the same size as the ones in the keyboard. Use an Xacto knife or razor blade. Make sure you don't leave naked foil - you don't want the foil to cause a short circuit. It's important to cover both sides of the foil with tape so you have a surface that can be glued to the foam on one side and non-conductive on the other. The shape is important as this piece will act as a capacitor.
If possible, instead of foam, use double sided foam tape and cut this into a circular piece the same size as the disk. Since it's sticky, you won't need to use glue.
As a replacement for the glue don't use fluid glue, this may ruin your keyboard, instead use a sticky glue.
If you use cleaning fluids or canned air to clean the keyboard, you can easily damage it.
Don't use any of these to clean the keyboard!
You may find that if you make your own disks that they may not work on the first attempt. Just try again until you get the right shape, and right thickness of foam.
On some of the failed attempts, I've discovered a few keys that do nothing at all, and one that sent a whole bunch of keystrokes. (I used MacWorks's keycaps application to test the keyboard as it shows the key state for the entire keyboard.)
I suspect that the foam has little purpose. It helps push the foil against the pads to build the temporary capacitor, however, it's non reactive, so it's just there to absorb the force of your keypress and possibly prevent too much pressure on the capacitor.
Source: Ray Arachelian experimenting on keyboards, inspired by a post by Dr. Helmut Post on LisaList 2005.11.06 with help from James MacPhail.
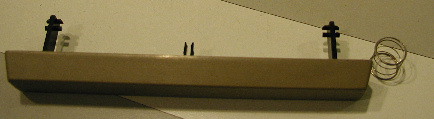
Fixing the space bar
The space bar is a little more tricky. It's composed of several pieces. On the back of the keyboard (where the silver disks are) you'll find that there is a white bar. This white bar on the inside of the keyboard should be connected to two black plastic levers that also connect to the space bar on the left and right.
The parts of these that look like equal signs connect to the white bar. The parts of these that look like crosses connect to the space bar itself.
It is easier to connect the two black levers to the white bar before connecting them to the space bar. Do this first, but don't yet connect them to the space bar.
There is also a black plastic center piece that fits into the center of the space bar. Place the square portion of this part inside the space bar now, leaving the protruding bars that look like tongs on the outside.
There should be a spring on the outside of this shaft which lifts the space bar back up. Place the spring over the shaft before attempting to attach the space bar.

In my case, the two side levers on the left and right had popped off and fell into the keyboard, and the spring was nowhere to be found. I looked through my pile of junk hardware and found a similar spring that fit, however, it wasn't strong enough, so instead I used a piece of wire binding from spiral bound notebook. The space bar doesn't feel quite right, but it's functional. Alternatively, if you happen to have a dead Lisa keyboard that you cannot fix, you can scavenge springs from it.
If you put the space bar in backwards, it will rub against the bottom keys and won't fit, so be careful to note its slope and how it should fit. The sloped portion is away from the keys.
To join the left and right side levers to the space bar, it's easier to hold them down from the keyboard side (where they mate into the white bar on the inside.) Then gently push their cross portions into the space bar. After they're in all the way, push the space bar into the key shaft, this will cause it to mate with the button.
Put everything back together
When you're done, put everything back together. When you screw the keyboard back in, you should screw in the large alternate diagonal screws first. i.e. top left, bottom right, top right, bottom left. Then flip the keyboard over and screw in the smaller screws.
Protect your work
When storing or otherwise not using the keyboard, make sure the keys are protected so that they are not held down. If pressure is applied to the foam for a long time, it may lose its shape and resilience and need replacement again.
External Info
http://z13.invisionfree.com/OneTrueKeyboard/index.php?showtopic=35 Discovered on 2006.10.20 Contains more pictures of a take apart of a Lisa keyboard and the foam.
� [LisaFAQ] > [Hardware] (Comment on this answer)